


2D Graphics Pipeline - 2D asset creation
Summary
I don't have or use the fancy graphic tools that professional artists use, and there really isn't much point in me having them. I can't really draw things that I like well enough that I would use them in a game. At least nothing other than smaller pixel art imagery.
I could likely practice and get better at drawing, but there is only so much time, and there is a ton of work that goes into any game. The artwork, while critically important to a game (not necessarily the gameplay), it is still just a part of the overall effort. I don't like to admit it, but I am not going to ever be able to create the artwork for a Triple-A title. This definitely puts constraints on the overall game design. (That is probably a good topic for a different article)
This article is limited to 2D image editing. (3D graphics/models will be an upcoming series of articles).
Without further ado, here are the primary tools I use in no particular order. I do all my GameDev work on a MacBook Pro, so these are all Mac versions.
- GIMP : All pixel level drawing, sprites, sprite sheet creation, animation frames, backgrounds, textures, tiles, etc
- PowerPoint : Screen layouts, buttons, sprites (yes sprites), etc
- Keynote : sprite design for specific cases
- Mobile Phone Camera : starting with a picture can speed things up
- Web images and video / Gen AI : good for ideas, I have yet to find exactly what I want.
The goal of this article is to illustrate my current approach to creating game graphics. It is not to teach how to use the tools listed above, but it will describe specific techniques for the examples provided. We'll cover a static image for a specific in-game achievement, an animated explosion, and one of the numerous background images in Earth Matters.
Inspiration
I often start with an Internet image-search to get conceptual ideas. I will typically do several searches for the type of object I am trying to create. For the first example, an achievement award, I might do an image search for “in game achievements” and/or “in mobile game achievements”.
Specifically for a set of achievement graphics, I know I want them to all be thematically similar. Since this is Gold Medal Games, it seemed like awarding gold medals for each completed achievement was a natural choice.
For the Earth Matters backdrop / background images, I searched on famous places on each continent. For the space levels I just tried
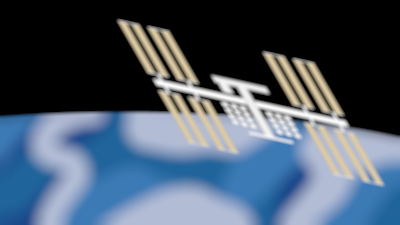
to think of what would be a cool image, then searched on it. As an example, we'll walk through creating the one with the space station.
For animated things, I usually end up searching for a video clip. I will then play it in slow-motion and/or scrub it frame by frame to identify keyframes. It helps with the shape and timing of animations. An explosion animation will illustrate how drastically things can change frame to frame (and still look good.)
High-Level Process
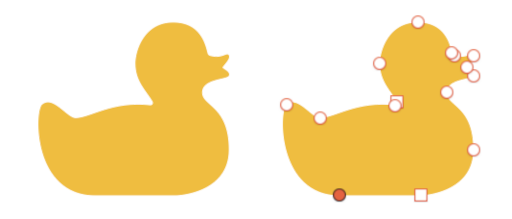
At this point I have a pretty good idea of what image I want to create. Keynote has a lot of built in shapes. Starting with one
of these shapes often saves a lot of time. The shapes are actually vector images. What does that mean? You can scale them up and
down and they retain their clarity. If you right-click on it you can select "Make Editable" and see the "points" that make up the
image's definition. Clicking and dragging on any of those points will modify the image. I find doing that typically isn't
too useful. Having them as a vector image is what is useful.
Decomposing what you want to create into it's component shapes makes it easy to create it quickly in PowerPoint. Think shapes, not images at this point. Shapes are made with vectors, where images are individual pixels in a 2D grid. If you copy a Keynote shape and paste it into PowerPoint, it does so as an image. If you make it larger it will get grainy because it is a pixel image. If the image is exactly what you want and the right size, then you are done. However, if it is a building block, vector shapes are crucial.
In Keynote export-to PowerPoint, then open it up in PowerPoint. This preserves the vector shapes. PowerPoint has straightforward shape editing. It allows adding, splitting, subtracting shapes from/to other shapes.
Since this is for games, often a static shape isn't enough. Things need to be animated. Take the coins in Earth Matters. As they move across the screen, they tumble. PowerPoint makes that pretty easy when you develop familiarity with it. I picked 8 frames of animation somewhat arbitrarily. A full rotation is 360°. Therefore 360 / 8 = 45, so each frame was an additional 45° rotation. Here is how in PowerPoint in a few simple steps.
- Add a circle shape - right click, format shape, select size and confirm height and width are equal
- Set the color - Fill, solid fill, pick a gold color in the color selector
- Add the same top and bottom bevel - Format Shape, 3-D Format, Hard Edge
- Double click shape and add EM text - Set font, size and color accordingly
- Make 8 coins - copy the coin, and paste 7 more times
- Animation Frames - Select each coin and increase they Y Rotation by 45° each time, Format Shape, 3-D Rotation: 45°, 90° 135°, ...
- Back of coins - A vector world image from a Keynote shape, rotated on Y axis and centered over each of the 3 coins where you can see the back
 All of the shading is done automatically by PowerPoint. No pixel by pixel editing in this case.
The last step is to make a sprite sheet from the individual images. This is done in GIMP by loading the individual animation-frame images into their own layer of the same image. There are a couple of methods to export things from PowerPoint.
- One method is to export the whole slide. File->Export...->File Format "PNG". Pick the largest dimensions it will let you pick. Typically it is best to only scale images to smaller sizes, otherwise they get blurry or grainy. However, doing so will mean you have to cut out each coin individually.
- If you have saved 1 image per slide and exported the whole deck as PNG images, you can load them into the same image in GIMP, each in its own layer. File->Open as Layers->Select files and open.
- Manually 1 by 1. Click a coin, copy, switch to GIMP and Edit->Paste as->New Layer
Ultimately the sprite sheet is going to be a .png image, so power-of-two dimensions are best for compression (Do an Internet search if you want to know why.) For the coins, each frame is a 128x128 pixel image. The frames then need to be laid out into a single sprite sheet format (See below)
Image Composition
Other than practice, I don't really have a suggestion on how to get good at thinking of an object you want to create and
figuring out how to compose it from base shapes. Let's take a look at one of the in-game achievement medals. This is
awarded when the player makes a visit to the sandbox in Earth Matters.

If something looks familiar, it is probably the fact that the medal is a larger version of a coin with a different face. There is a slight twist in that the background of the coin-face is darker than it otherwise would be. I added a circle with a darker color and centered it over the medal(coin)
The sandbox itself is 2 rectangles stacked vertically. Since thematically it is supposed to look like an embossed medal, I didn't combine the rectangles into a single shape. This allowed each to have their own bevel.
The "sand" is a cloud shape mostly hidden by layering it under the sandbox. This is done in PowerPoint with the Arrange menu, and moving things forward or backward.
The shovel handle is where things got interesting. There isn't a shape for that. Here are step by step instructions on a way to create it in PowerPoint.
- Add the flowchart "Delay" shape
- Size it using a corner drag to something like this:

- Lock the aspect ratio in the Format Shape's Size panel
- Copy the shape, past it back and change the color to black
- Shrink the new shape down slightly and center over the original shape

- Select the original shape, then command-click the smaller shape. From the Shape Format tab, Merge Shapes->Subtract. Results in a D shape like this:

- Add rectangle and align it so it connects to the handle like this:

- From the Shape Format tab, Merge Shapes->Union
- Set the color to gold (#FFD700)
- Apply the bevel in the Format Shape panel's Effects tab->3-D Format->Top Bevel->Soft Round

We now have a single shape with a proper bevel that can be rotated, and more importantly sized correctly, into position. No drawing skills required.
I use this method to create all sorts of objects. It works well for buttons and other UI componenents,
but not necessarily for gameplay objects. (Of course that depends on the style of game you are creating.) For Earth Matters,
I actually created the characters using this method.
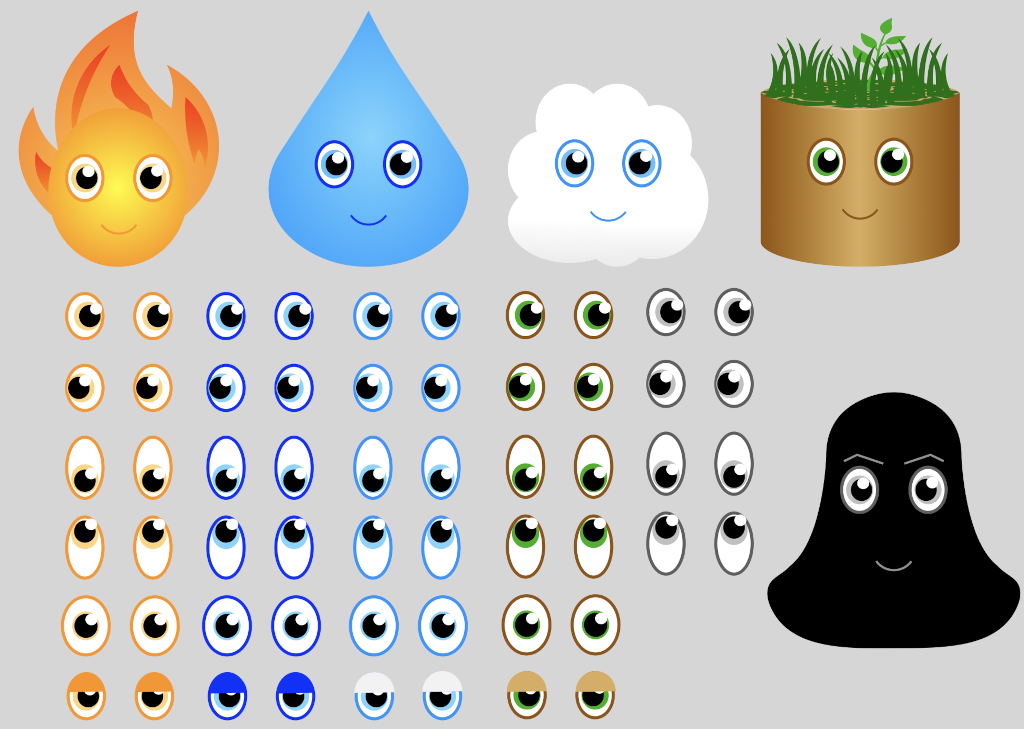
Image Drawing
For the games I create, I tend to stick with relatively small pixelart images. This works just fine for mobile games. The larger the images needed, the more time required to draw them. I typically start from a base image or animation, and draw over the top of it/them.
A backdrop image provides a good shape-basis, but usually not with a style consistent with everything in your game. (So far, this includes using Gen AI to create image assets.) What do I mean by a backdrop image? Literally opening an image in GIMP, then adding layers over it and start drawing.
Add a layer in GIMP for anything you want to draw. I cannot recommend this enough!!!!! This allows for the most flexibility. Always do this. No exceptions. You will discover why the hard way if you do not. For example, if you want to move something over slightly, if it isn't on its own layer, you have to select it somehow, cut it out and past it back in. Then touch things up, which can be a lot of unwanted effort.
My other recommendation is to always draw big. Real big. Save the original art at the original big size. When exporting images to be used within a game, I then scale it down to the final in-game size. But always, always, always keep the original!
Most rules have exceptions, and my last recommendation is no different. When doing final pixelart edits, meaning at the pixel level, those edits are easier to do at the final in-game size. (This depends on the overall artistic style of your game. Things like anti-aliasing can come into play when scaling.)
For Earth Matters, one of the animations is an explosion. I searched the internet for a good explosion video that I could scrub frame by frame. One thing I learned is that the expansion part is incredibly fast, and the rest is a fadeout. Here is where some artistic license comes into play. It has to look and feel right for the game you are creating. Realism doesn't matter if it looks crappy.
Earth Matters is intended to have a cartoon-like feel. Here are the 9 frames for the explosion artwork.

Since there are 9 frames, I took the video clip, divided its time by 9 to figure out the approximate intervals for keyframes. Each keyframe was used as a base image to inspire the cartoon drawing. This is where some drawing skills come in handy. Since it has a cartoon feel, I avoided gradient shading. I used a smaller pallete of bright colors. The shading I did do is with the gray colors in this example. There is a light and dark gray used in some frames. This looked good on the final devices. Mobile displays are typically smaller and a starker contrast looked better to me than a smooth gradient.
For Earth Matters, I used more of an old-school hand drawn cartoon feel than the newer CGI approach. There is no magic here. I used a mouse and often the touchpad on my Mac to edit pixels one by one. That being said, a tip from moving from one frame to the next is to copy the previous frame(layer) and paste to a new layer, and edit that. So each frame(each on its own layer) is just a relatively small edit from the previous one.
Making a Sprite Sheet
In theory at this point, you have all your animation frames as their own layer in GIMP, and those layers are ordered correctly in how they will animate. If this is the case, then it is pretty easy to create a usable sprite sheet.
GIMP has the ability to run code. I'll say it is Python-like and not actual Python. I say this because there is some quirkiness around certain commands that seem to require an extra line-feed as if you are pressing enter on some dialog box. There is also quirkiness when multiple images are open and running Python-fu code. For things to run correctly it generally works best to only have 1 image open in GIMP.
Anyway, we will use Python-Fu to position the frames on a single sprite sheet, because trying to move them into place manually is incredibly error-prone and time-consuming. To access Python-Fu, in GIMP select Filters->Python-Fu->Console. That will open up a console window where you can copy and paste in the following code and press enter or return to run it.
Before doing so though, first create a new transparent layer that is the combined width of all of your frames. Number_of_frames * pixel_width_of_frame = new layer's width. Make this the base (last) layer in the layer stack/list. With that done, now paste in the following and hit enter to run it.
- The first line sets a variable that is the image we are working with. (This is were having multiple images open in GIMP causes issues. It might be fixed, but I have gotten in the habit of closing all other open images first.)
- The second line loops through all of the image layers
- The third line sets the position of each layer 512 pixels to the right of the previous one. (For the explosion animation, each frame is 512x512 pixels. That is why 512 is used here.)
If you want to layout your sprites in a 2-D fashion you can use the following Python-Fu script instead. You need to make sure you scale the base transparent layer to the final size of your spritesheet. However many rows and columns you want, each * the total number of pixels in a frame (width and height) In the example below, the frames are 512x512 pixels
The difference between this example and the previous one is it will put 4 frames per row. The first 512 is the pixel-width of each frame. The second 512 is the pixel-height of each frame.
You can probably load and save scripts in GIMP, but I prefer having a more configurable version (than what I show above) without magic #s under source control. I specifiy the pixel dimensions and the number of columns in the spritesheet as variables, and then copy/paste into the Python-Fu console.
Background Images
Each area in Earth Matters has 3 background images that represent something from that area in real life. From the pyramids of Egypt to the big storm on Jupiter, I was striving to create something familiar that looked good. Herein lies the trick though. The better I made the background images, the more they detracted from gameplay. On some levels it was difficult to tell the background from the foreground. So much for highly detailed great looking backgrounds.
If you remember from above when I mentioned draw big and scale down, I also mentioned rules have exceptions. This is one of those cases
where I intentionally scaled things down, blurred them, and let them scale back up on-device. The end result being a background that
(hopefully) looks good, but remains in the background because it is a little blurry. It isn't particularly pleasant to look at on its
own, but is intended to complement the game-levels.
If you look at the space station, you can pretty easily see it is a 2-D image rotated slightly via, yep - you guessed it, PowerPoint. It is literally a bunch of rectangles laid out in a pattern to resemble the ISS. The techniques to accomplish this have already been discussed above, so I'll skip over that, and move on to Earth.
I really did not want to try and draw the blue marble that is our planet. Since this is from space, I figured I could get away with displaying some clouds over an ocean. Then some heavy use of blurring to make it look better than it otherwise would. The planet is just part of a giant circle filled in with a shade of blue. I then used a big brush size in GIMP to squiggle-draw some cloud shapes. (Remember, each thing on its own layer)
With a darker shade of blue I added some shadowing around the edges of the clouds to give things some depth. I did this by positioning the shadow layer over the water, but under the clouds. I was then free to draw around the clouds without modifying them or the water, but quickly and easily create some shadowing effects.
At this point I had a large crisp image that looked like I had no art skills (which is not far from the truth.) What comes next is how to make it a usable asset. I scaled the images down to 400x225 pixels, knowing all devices would scale them back up to fill their respective screens, creating some bluriness. But I wasn't done, there was one final step to get the right amount of blur.
In GIMP, I selected Filters->Blue->Lens Blur, then changed the Radius in the dialog to create the right amount. It was usually a 2, 3, or 4 pixel radius, depending on the image. You can see a live preview as you change the value. The blurring basically results in blending things together to cover up the shortcomings in the low quality drawing.
I found this technique to be valuable in that I could create decent looking backgrounds in short amount of time.
Wrap Up
The more you use the tools, the better you will get. Whether mentally breaking an image down into components so you can piece it together like the sandbox shovel, or drawing full blown images (and animations), practice will only make you better.
What if you don't know what you want it terms of graphics as you build your game, but you need art assets immediately? Embrace this! Drop something representative in place, or even grey-box it, if beginning a new project. I often use an emoji that is close to what I want and scale it appropriately. Even doing that influences artistic direction (whether you like the emoji or not.) As things take shape, you will likely discover a style you want to use. Assuming you aren't afraid of refactoring code to make it better, allow yourself time to refactor your artwork. I try to incorporate time in the schedule to allow for a complete art review and refactor.
I often find some of the earliest created assets are of lower quality than the more recently created ones. Perhaps because I started using some new technique along the way. Having the time to go back and clean things up takes the pressure off of having to figure everything out up front, which can often lead to analysis paralysis.
Hopefully there is something useful in this that helps you with your own project!